Author Affiliations
1Shanxi Provincial Key Laboratory of Advanced Manufacturing Technology, North University of China, Taiyuan, Shanxi 0 30051, China2China Special Equipment Inspection & Research Institute, Beijing 100029, China;3Institute of Acoustics, Chinese Academy of Sciences, Beijing 100190, Chinashow less
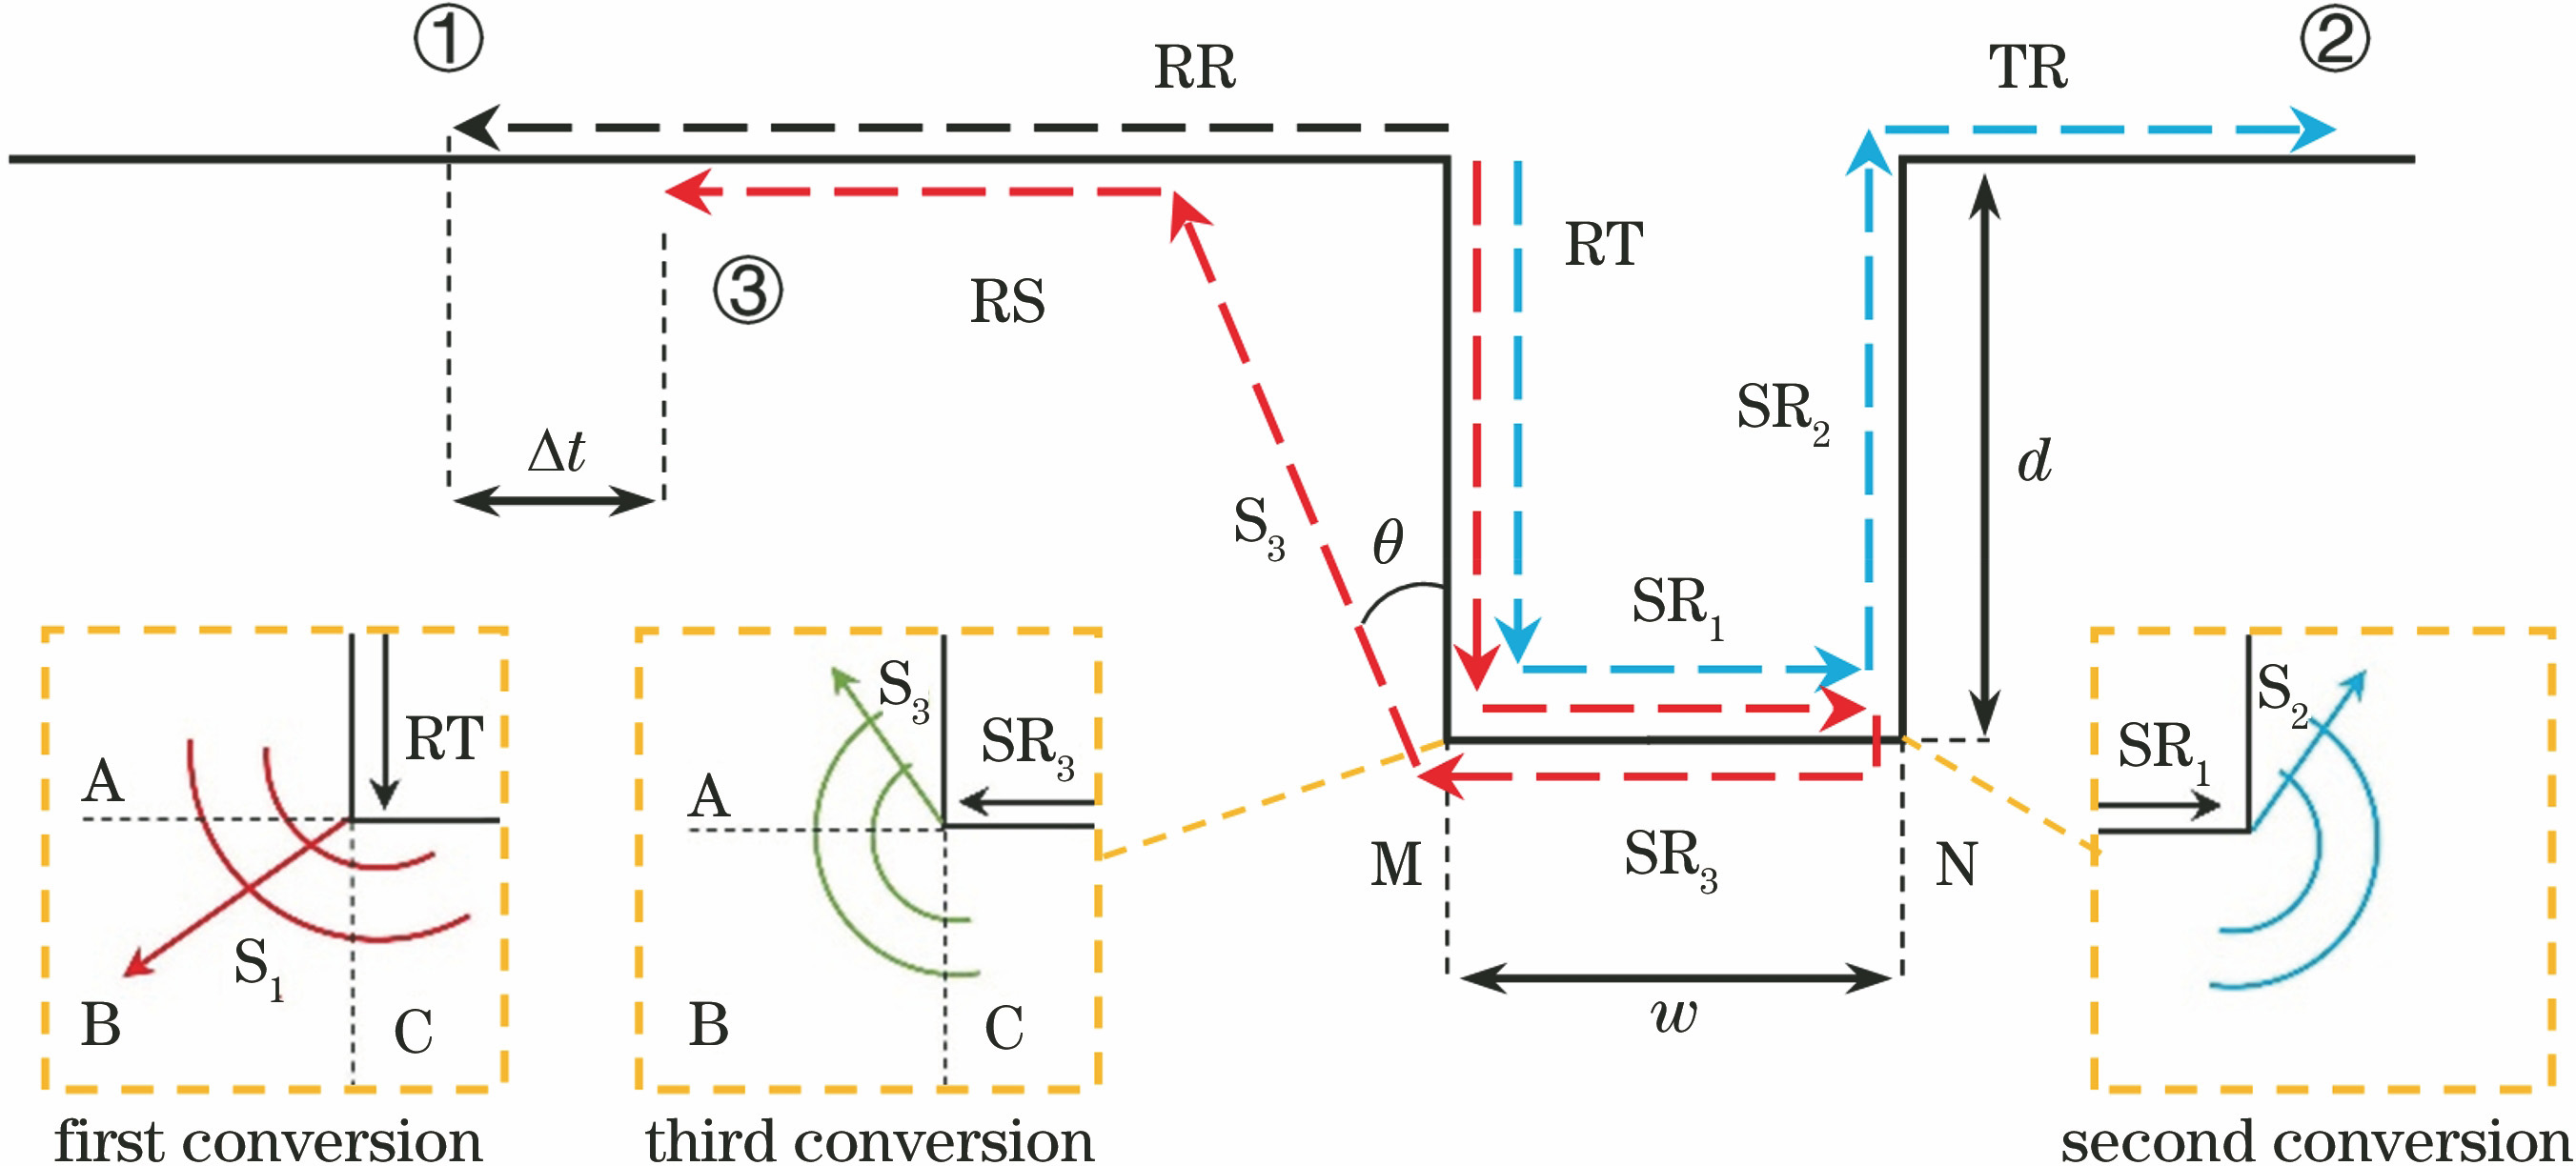
Fig. 1. Waveform conversion phenomenon at tip of surface defect
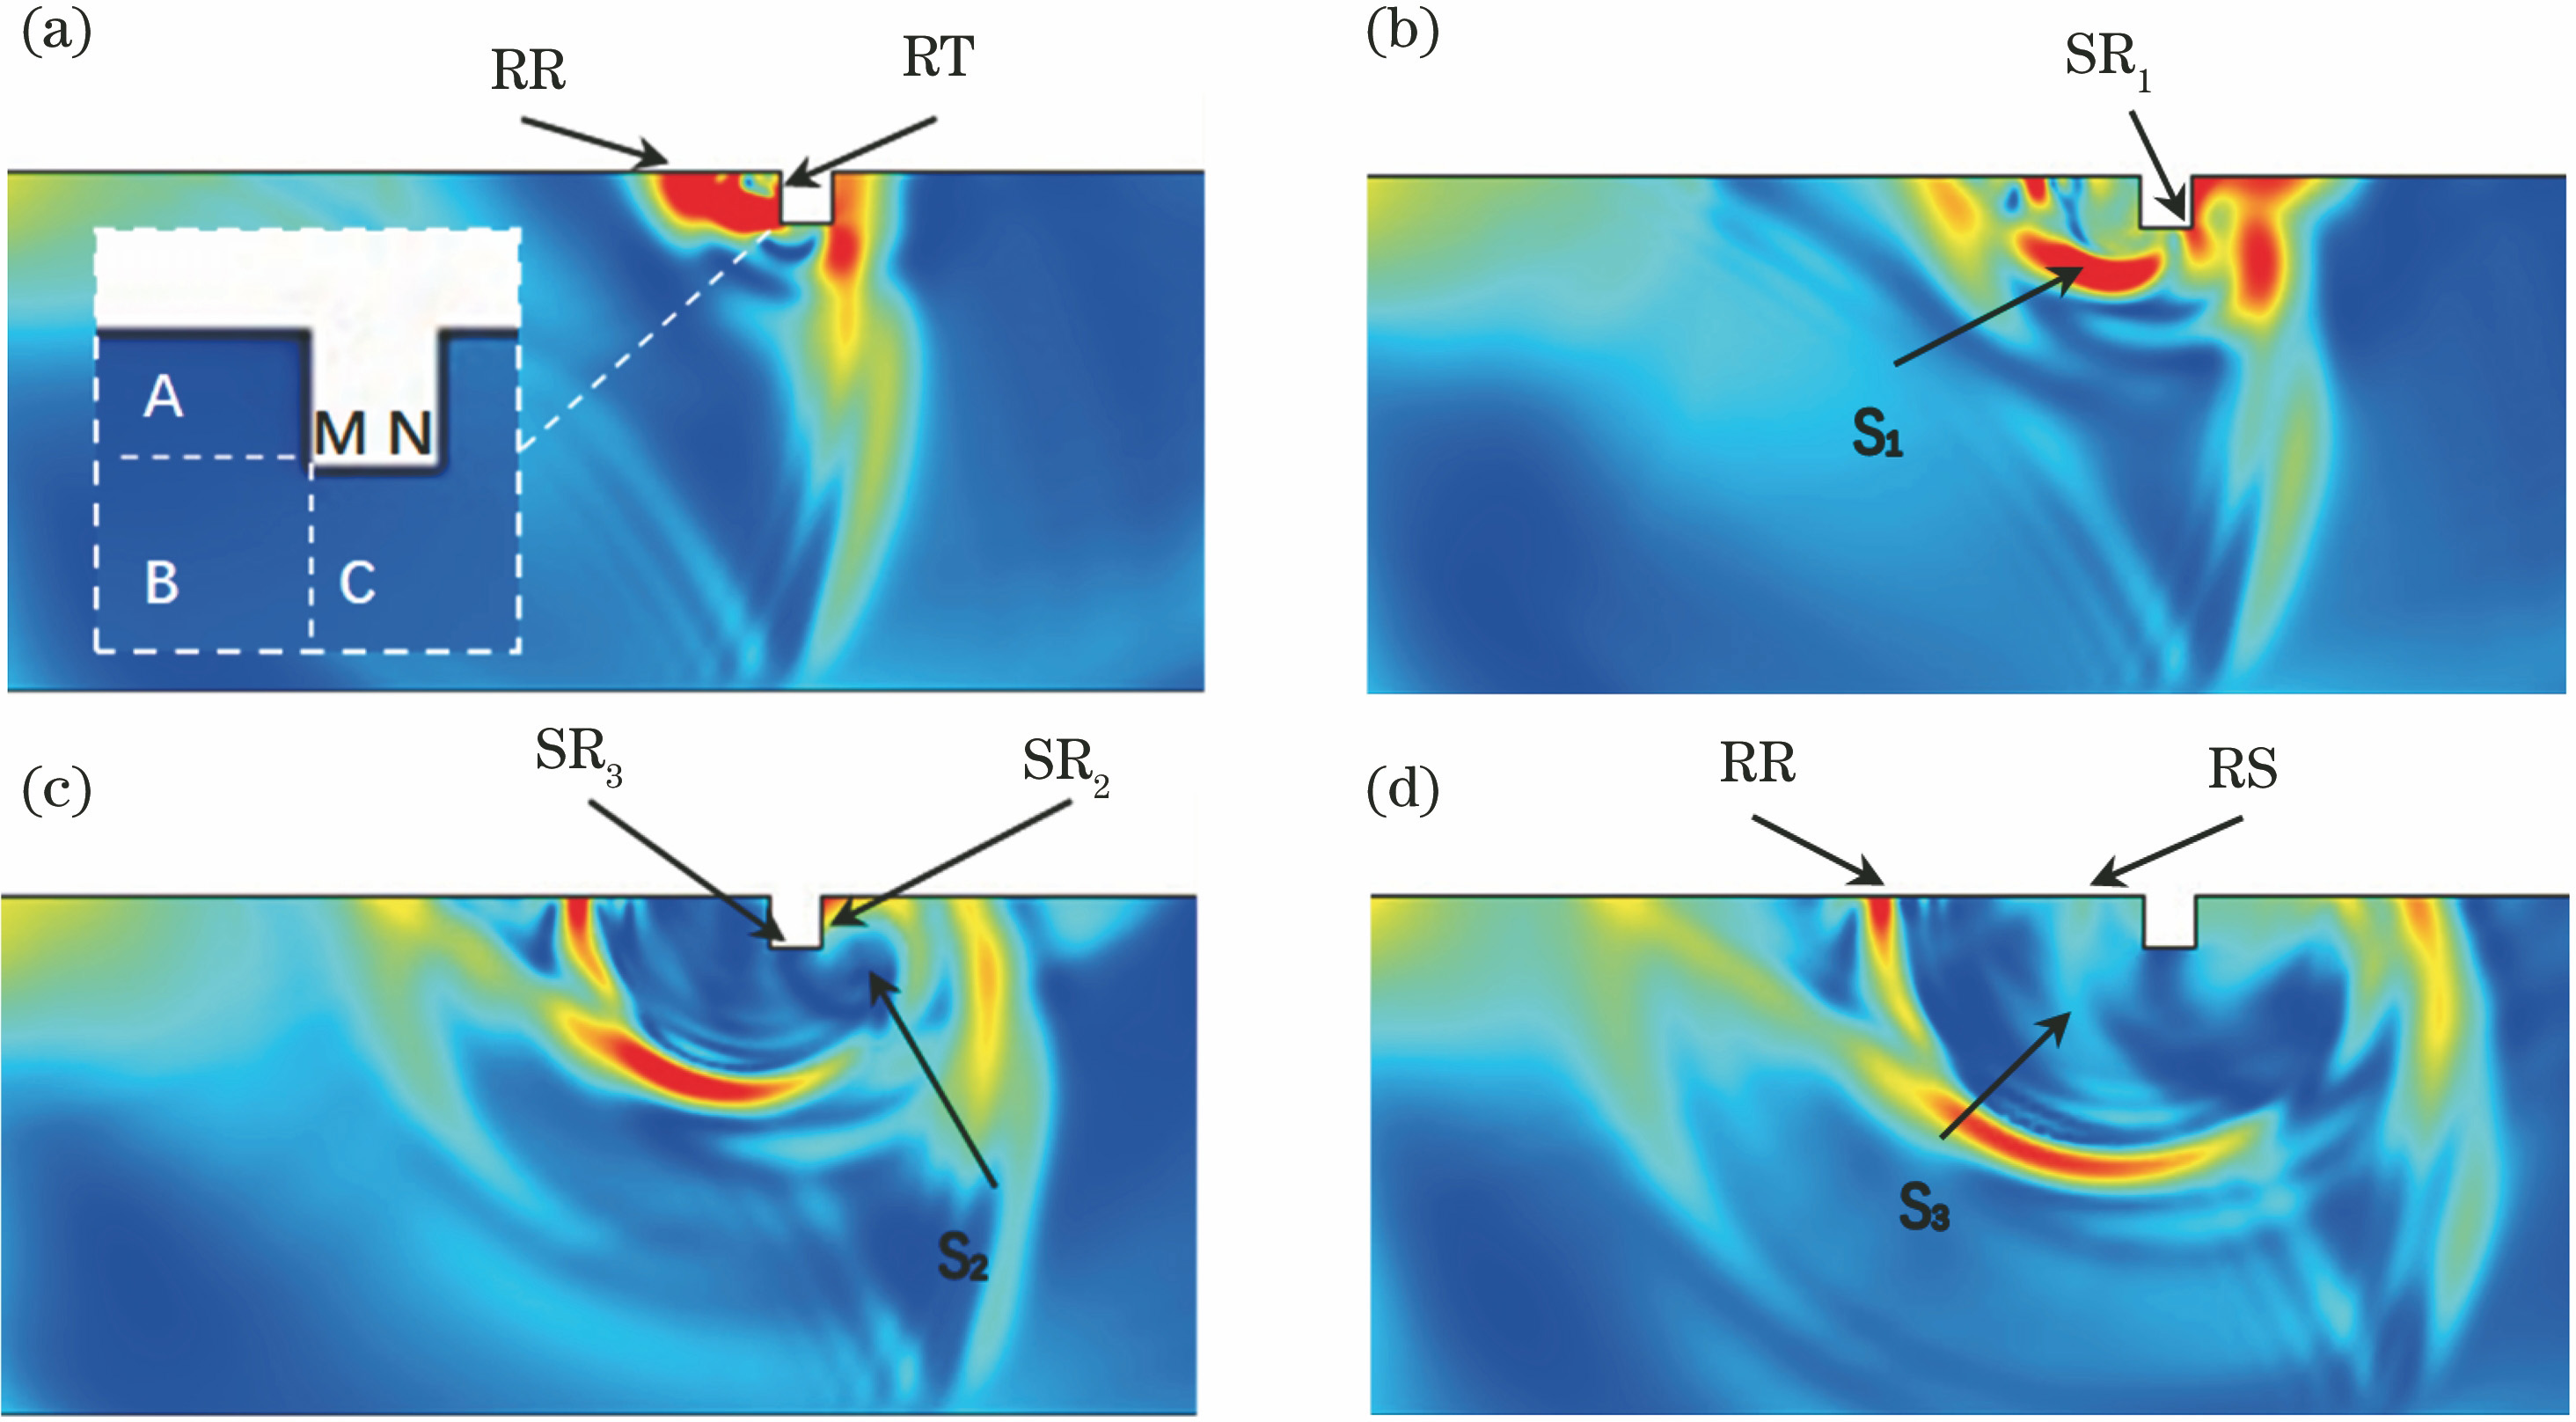
Fig. 2. Ultrasonic field of surface defect at different moments. (a) 3.77 μs; (b) 3.95 μs; (c) 4.26 μs; (d) 4.51 μs
Fig. 3. Simulation waveforms of narrow defect
Fig. 4. Simulation waveforms of extremely narrow defects
Fig. 5. Simulation waveforms of wide defects
Fig. 6. Experimental platform of laser ultrasound and sample
Fig. 7. Experimental detection waveforms
Fig. 8. Depth measurement results of narrow defects
Fig. 9. Depth measurement results of narrow defect and extremely narrow defect
| Defect size /(mm×mm) | 0.2×0.1 | 0.2×0.2 | 0.3×0.2 | 0.4×0.2 | 0.5×0.2 |
|---|
| tRR /μs | 4.71 | 4.71 | 4.71 | 4.71 | 4.71 | | tRS /μs | 4.91 | 5.01 | 5.08 | 5.12 | 5.18 | | Δt /μs | 0.20 | 0.30 | 0.37 | 0.41 | 0.47 | | Measuring depth /mm | 0.1865 | 0.1798 | 0.3150 | 0.3924 | 0.5083 | | Error /mm | -0.0135 | -0.0202 | 0.0150 | -0.0076 | 0.0083 | | Error rate /% | 6.74 | 10.12 | 5.02 | 1.91 | 1.66 |
|
Table 1. Simulation data of narrow defects
| Defect size /(mm×mm) | 1×0.05 | 2×0.1 | 3×0.1 | 4×0.1 | 5×0.1 |
|---|
| tRR /μs | 4.71 | 4.71 | 4.71 | 4.71 | 4.71 | | tRS /μs | 5.27 | 5.74 | 6.28 | 6.86 | 7.45 | | Δt /μs | 0.56 | 1.03 | 1.57 | 2.15 | 2.74 | | Measuring depth 1 /mm | 1.0822 | 1.9905 | 3.0341 | 4.1550 | 5.2952 | | Error 1 /mm | 0.0822 | -0.0095 | 0.0341 | 0.1550 | 0.2952 | | Error rate 1 /% | 8.22 | 0.47 | 1.14 | 3.88 | 5.90 | | Measuring depth 2 /mm | 0.9822 | 1.7905 | 2.8341 | 3.9550 | 5.0952 | | Error 2 /mm | -0.0178 | -0.2095 | -0.1659 | -0.0450 | 0.0952 | | Error rate 2 /% | 1.78 | 10.47 | 5.53 | 1.12 | 1.90 |
|
Table 2. Simulation data of extremely narrow defects
| Defect size /(mm×mm) | 0.1×0.2 | 0.1×0.25 | 0.2×0.25 | 0.2×0.3 | 0.2×0.5 |
|---|
| tRR /μs | 4.71 | 4.71 | 4.71 | 4.71 | 4.71 | | tRS /μs | 4.92 | 4.95 | 5.01 | 5.06 | 5.19 | | Δt /μs | 0.21 | 0.24 | 0.30 | 0.35 | 0.48 | | Measuring depth /mm | 0.0058 | -0.0362 | 0.0798 | 0.0764 | -0.0724 | | Error δ /mm | -0.0942 | -0.1362 | -0.1202 | -0.1236 | -0.2724 | | Error rate /% | 94.16 | 136.19 | 60.12 | 61.80 | 136.19 |
|
Table 3. Simulation data of wide defects
| d /mm | 0.1 | 0.2 | 0.3 | 0.4 | 0.5 |
|---|
| tRR /μs | 20.52 | 20.52 | 20.52 | 20.52 | 20.52 | | tRS /μs | 20.73 | 20.82 | 20.88 | 20.94 | 21 | | Δt /μs | 0.21 | 0.3 | 0.36 | 0.42 | 0.48 | | Measuring depth /mm | 0.0058 | 0.1798 | 0.2957 | 0.4117 | 0.5276 | | Error δ /mm | -0.0942 | -0.0202 | -0.0043 | 0.0117 | 0.0276 | | Error rate /% | 94.16 | 10.12 | 1.43 | 2.92 | 5.53 |
|
Table 4. Experimental data of surface defects
| d /mm | 0.1 | 0.15 | 0.2 | 0.25 | 0.5 | 0.75 | 1 |
|---|
| tRR /μs | 4.71 | 4.71 | 4.71 | 4.71 | 4.71 | 4.71 | 4.71 | | tRS /μs | 4.86 | 4.88 | 4.9 | 4.93 | 5.08 | 5.23 | 5.32 | | Δt /μs | 0.15 | 0.17 | 0.19 | 0.22 | 0.37 | 0.52 | 0.61 | | Measuring depth 1 /mm | 0.2899 | 0.3285 | 0.3672 | 0.4252 | 0.7150 | 1.0049 | 1.1789 | | Error 1 /mm | 0.1899 | 0.1785 | 0.1672 | 0.1752 | 0.2150 | 0.2549 | 0.1789 | | Error rate 1 /% | 189.88 | 119.02 | 83.59 | 70.07 | 43.01 | 33.99 | 17.89 | | Measuring depth 2 /mm | 0.0899 | 0.1285 | 0.1672 | 0.2252 | 0.5150 | 0.8049 | 0.9789 | | Error 2 /mm | -0.0101 | -0.0215 | -0.0328 | -0.0248 | 0.0150 | 0.0549 | -0.0211 | | Error rate 2 /% | 10.12 | 14.31 | 16.41 | 9.93 | 3.01 | 7.32 | 2.11 |
|
Table 5. Cooper’s experimental data analysis
| d /mm | 0.3 | 1 | 2 | 3 | 4 | 5 |
|---|
| tRR /μs | 4.71 | 4.71 | 4.71 | 4.71 | 4.71 | 4.71 | | tRS /μs | 4.96 | 5.32 | 5.84 | 6.32 | 6.87 | 7.45 | | Δt /μs | 0.25 | 0.61 | 1.13 | 1.61 | 2.16 | 2.74 | | Measuring depth 1 /mm | 0.4831 | 1.1789 | 2.1838 | 3.1114 | 4.1743 | 5.2952 | | Error 1 /mm | 0.1831 | 0.1789 | 0.1838 | 0.1114 | 0.1743 | 0.2952 | | Error rate 1 /% | 61.05 | 17.89 | 9.19 | 3.71 | 4.36 | 5.90 | | Measuring depth 2 /mm | 0.2831 | 0.9789 | 1.9838 | 2.9114 | 3.9743 | 5.0952 | | Error 2 /mm | -0.0169 | -0.0211 | -0.0162 | -0.0886 | -0.0257 | 0.0952 | | Error rate 2 /% | 5.62 | 2.11 | 0.81 | 2.95 | 0.64 | 1.90 |
|
Table 6. Data analysis for Jeong’s experiment


