| Visual testing | Using the light that reflected or transmitted from the measured object to image in the eye or photosensitive device | General cladding coating and macroscopic crack | Cheap, simple, and wide application | Only evaluate surface condition, need an effective light source and it must be accessible during detection |
| Penetrant testing | The liquid containing visible or fluorescent substances is applied to the surface of the workpiece, and the capillary phenomenon acts it into the crack | General cladding coating and macroscopic crack | Cheap, sensitive, general and easy to operate | Only evaluate surface condition. The surface condition must be relatively smooth and free of contaminants |
| Magnetic particle testing | After magnetizing the tested workpiece, fine magnetic powder is applied to the coating surface, and the magnetic powder is arranged at the crack | Magnetic material and medium crack | Fast,sensitive and general | Only evaluate magnetic material’s surface condition |
| Radiographic testing | The film is exposed when the X-ray passes through the inspected object, and the crack has an effect on the exposure | General cladding coating and medium crack | Permanent recording, high sensitivity, and wide application | Detection range is related to the material density. Radiation pollution |
| Ultrasonic testing | When ultrasonic propagates in the workpiece, it will reflect when crack occurs | Simple shape and good surface roughness, and medium or micro crack | Fast, accurate, sensitivity. Obtainable location and defect properties | Limiting to shape. Coupling agent required |
| Eddy current testing | Local current field is produced in the coating under the action of electromagnetic induction | Conductive materials, and medium or micro crack | Fast, general, sensitive and non-contact, suitable for automatic inspection | Limiting to material |
| Infrared thermal imaging testing | Measure the temperature change of coating with temperature sensor, detector or camera | General cladding coating and macroscopic crack | Sensitive to micro temperature changes, permanent records provided | It can’t effectively detect the cracks in thick parts, and the evaluation is difficult |
| Acoustic emission testing | When a crack occurs, the energy is released and propagates in the form of stress wave, which can be detected by sensors | General cladding coating and medium or micro crack | The ability to monitor the damage of large area and effectively predict the failure | The sensor must contact the surface to be detected. Defect location requires multiple sensors |
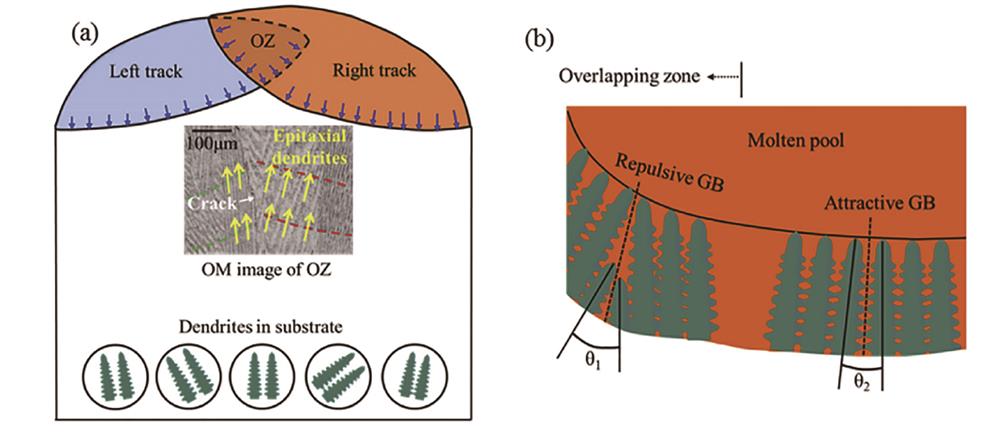
![Dendrite growth diagram[25].(a) Dendrite growth diagram in the lap zone; (b) formation of attractive and repulsive grain boundaries](/richHtml/lop/2021/58/7/0700006/img_1.jpg)
![Effect of mechanical vibration on cladding[63].(a)Without mechanical vibration;(b)with mechanical vibration](/richHtml/lop/2021/58/7/0700006/img_2.jpg)


