• Laser & Optoelectronics Progress
  • Vol. 59, Issue 13, 1300002 (2022)
Xingshou Zhang1, Qinying Wang1、*, Huaibei Zheng2、4, Tingyao Liu4, Lijin Dong1, Yuchen Xi1, Jin Zhang1, and Shulin Bai3
Author Affiliations
  • 1School of New Energy and Materials, Southwest Petroleum University, Chengdu 610500, Sichuan , China
  • 2State Key Laboratory of Metal Material for Marine Equipment and Application, Anshan 114009, Liaoning , China
  • 3College of Engineering, Peking University, Beijing 100871, China
  • 4Chengdu Advanced Metal Materials Industry Technology Research Institute Corporation, Chengdu 610303, Sichuan , China
  • show less
    DOI: 10.3788/LOP202259.1300002 Cite this Article Set citation alerts
    Xingshou Zhang, Qinying Wang, Huaibei Zheng, Tingyao Liu, Lijin Dong, Yuchen Xi, Jin Zhang, Shulin Bai. Residual Stress and Stress Corrosion of Alloy Materials in Laser Additive Manufacturing[J]. Laser & Optoelectronics Progress, 2022, 59(13): 1300002 Copy Citation Text show less
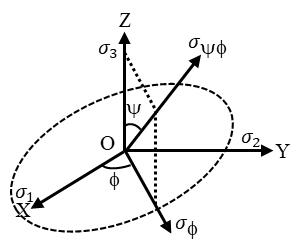
    Stress and strain system in coating[31]
    Fig. 1. Stress and strain system in coating31
    Mechanism of the theory of film breaking[67]
    Fig. 2. Mechanism of the theory of film breaking[67]
    MethodTechnologyAdvantageDisadvantage
    Mechanical methodDrilling methodSimple principle,cheap equipment,easy to operateDamage to the material,measurement accuracy is not high
    Nanoindentation methodHigh resolution,make the material deform in a very small range without destroying the structural integrity of the material,high measurement efficiencyMeasurement result is not unique,the measurement accuracy is not high
    Physical methodX-ray diffraction methodThe measurement result is more accurate,the material is not damaged,the strain field distribution on the surface of the material can be measuredCan only measure near-surface information,testing instruments are expensive
    Neutron diffraction methodLarge penetration depth,three-dimensional stress field distribution can be obtainedExperimental equipment is expensive
    Table 1. Comparison of residual stress testing methods
    MethodScope of application
    PreheatingSuitable for key components of high-value and high-precision equipment,not suitable for industrialized mass-produced products
    Ultrasonic shock or vibrationSuitable for improving small size and relatively large size components
    Laser process controlSuitable for laser additive manufacturing of workpieces and laser cladding layers
    Table 2. Main method of laser cladding layer to improve residual stress
    MethodEvaluation indexAdvantageDisadvantageApplicability
    Constant load methodTime to break,percentage of breaking elongationInitial stress determination,simple test method,no restriction on sample type and sizeUnable to obtain crack growth informationCladding layer,bulk material
    Constant displacement methodTime to breakDevice is simple and easy to implement,and can obtain crack growth parametersUnclear stress state,long test periodCladding layer,bulk material
    Slow strain rate methodTime to break,percentage of breaking elongation,section shrinkageShort test period,high sensitivity to stress corrosion crackingComplex equipment and strain rate have a significant impact on the resultsCladding layer,bulk material
    Table 3. Comparison of stress corrosion testing methods
    Xingshou Zhang, Qinying Wang, Huaibei Zheng, Tingyao Liu, Lijin Dong, Yuchen Xi, Jin Zhang, Shulin Bai. Residual Stress and Stress Corrosion of Alloy Materials in Laser Additive Manufacturing[J]. Laser & Optoelectronics Progress, 2022, 59(13): 1300002
    Download Citation