Shixiang Wang, Lingbao Kong, Lü Haoyu. Advances in Measurement and Error Evaluation Technique of Optical Freeform Surfaces[J]. Acta Optica Sinica, 2023, 43(8): 0822013
Search by keywords or author
- Acta Optica Sinica
- Vol. 43, Issue 8, 0822013 (2023)
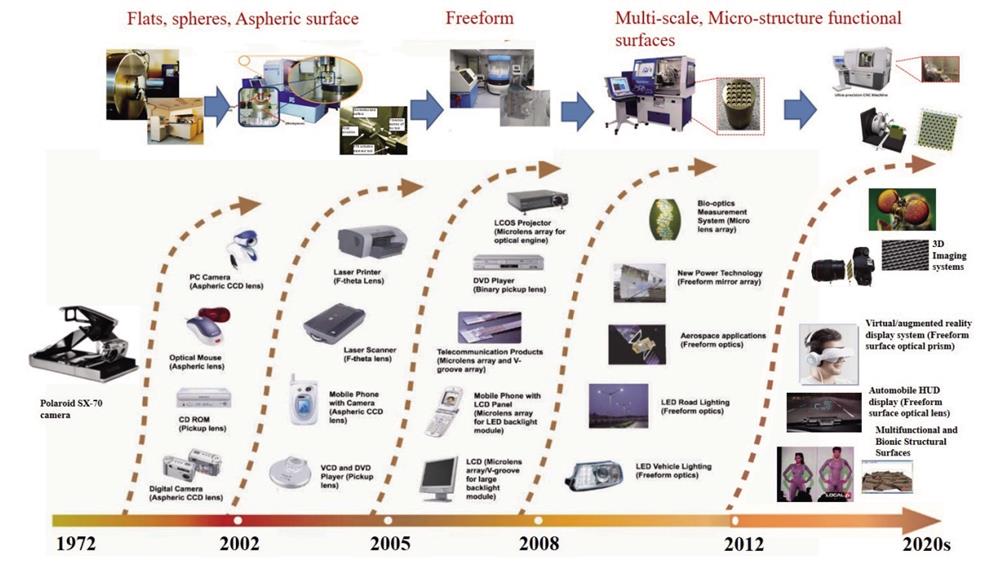
![Roadmap of wide application of optical freeform surface[11]](/richHtml/gxxb/2023/43/8/0822013/img_01.jpg)
Fig. 1. Roadmap of wide application of optical freeform surface[11]
![Commercial measurement devices[11]](/richHtml/gxxb/2023/43/8/0822013/img_02.jpg)
Fig. 2. Commercial measurement devices[11]
Fig. 3. Nanoscale CMM. (a) NMM-1 following the Abbe principle[25]; (b) NMM-1 picture[25]; (c) Isara 400 following the Abbe principle[27]; (d) Isara 400 picture[27]
Fig. 4. Scanning methods with negligible force. (a) Working principle of AFM[36]; (b) working principle of STM[36]
Fig. 5. Working principles of some measurement probes. (a) Multi-probe measurement scheme based on laser focus principle[26];(b) microscope revolver with multiple probes[26]; (c) working principle of UA3P-3000[37]
Fig. 6. Optical profile scanner. (a) Principle of multiwavelength interferometer[38]; (b) structure of LuphoScan[38]; (c) principle of chromatic confocal measurement[39]; (d) structure of NANOMEFOS[39]
Fig. 7. CGH measurement. (a) Schematic of zero interference of freeform surface CGH[48]; (b) design of Cat-eye CGH; (c) sample of Cat-eye CGH
Fig. 8. Subaperture measurement methods. (a) Schematic diagram of circular subaperture stitching interferometry[54];(b) schematic diagram of TWI[65]
Fig. 9. Adaptive interferometry. (a) Schematic of DM adaptive interferometry[71]; (b) interference experimental device based on DM[71];(c) schematic of SLM-based adaptive interferometry[72]; (d) SLM-based interference experimental device[72]
Fig. 10. Schematic diagram of phase deflectometry measurement[77]
Fig. 11. Shack-Hartmann measurement method. (a) Schematic of Shack-Hartmann measurement[53]; (b) freeform surface measurement by Shack-Hartmann measurement method based on scanning[90]
Fig. 12. Measurement system based on point laser[97]
Fig. 13. Scanning electron microscope based on flying cutting machine[101]
Fig. 14. Schematic of Fizeau interferometer based on diamond turning machine[94]
Fig. 15. Surface measurement based on PMD[108]
Fig. 16. Intrinsic feature surface registration method[132]. (a) Gaussian curvature of lens array; (b) measured results of MLA and f-theta; (c) surface error of microlens after registration; (d) mean curvature of sinusoidal surface array; (e) measured results of composite structure of cylinder and sinusoidal surfaces; (f) surface error of sinusoidal surface array after registration
Fig. 17. Fiducial-aided surface registration method[134]. (a) Schematic of FA-CAD; (b) accuracy comparison of fiducial-aided registration and ICP
Fig. 18. Form deviation of integrated freeform surfaces after individual measurement and calibration[169]
Fig. 19. Measurement of integrated freeform surface[171]. (a) Setup for shape and position measurement; (b) sample; (c) measurement result

Set citation alerts for the article
Please enter your email address


