Search by keywords or author
- Spectroscopy and Spectral Analysis
- Vol. 41, Issue 8, 2343 (2021)
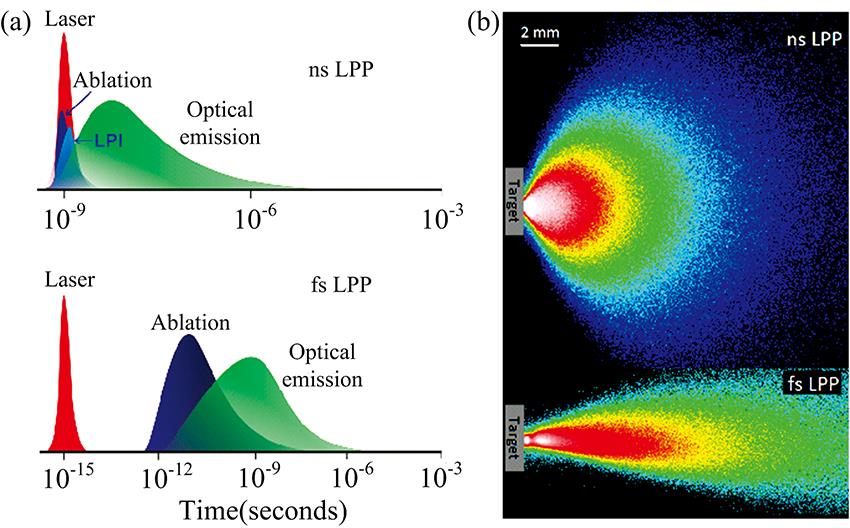
![(a) Approximate time scales of nanosecond and femtosecond laser ablation and visible emission from the plasma, and (b) images of ns and fs laser-produced plasmas recorded under similar laser fluence conditions[39]](/richHtml/gpxygpfx/2021/41/8/2343/img_1.png)
Fig. 1. (a) Approximate time scales of nanosecond and femtosecond laser ablation and visible emission from the plasma, and (b) images of ns and fs laser-produced plasmas recorded under similar laser fluence conditions[39]
![Scheme of the multidimensional composition information provided by LIPS by storing spectral information with spatial coordinates[40]](/richHtml/gpxygpfx/2021/41/8/2343/img_2.png)
Fig. 2. Scheme of the multidimensional composition information provided by LIPS by storing spectral information with spatial coordinates[40]
Fig. 3. (a) Monitoring and processing setup of laser welding based on the monitoring of plasma spectroscopy, (b) characterization curve of penetration depth as a function of the Fe(Ⅰ) electron temperature, at a welding speed of 50 mm·s-1, (c) controller layout with the input signal of electron temperature[47]; (d) schematic diagram of the plasma monitoring system for laser welding; The correlations of dimensionless micro-hardness of molten zone and dimensionless energy density (e), dimensionless intensity of spectral lines and dimensionless energy density (f)[48]
Fig. 4. (a) Experimental setup of laser processing based on single-pulse laser induced plasma spectroscopy, (b) representation of method to identify working focus position of laser processing based on monitoring emission intensity, (c) plasma emission intensity observed during laser scribing for different lens-to-sample distances. Samples: AlN, steel, soda lime and 1737 glass[36]; (d) Experimental setup of femtosecond laser processing system based on the monitoring of the multi-pulse laser induced plasma spectroscopy, (e) the intensity ratios of plasma signals induced by single- and multi-pulse laser processing[17]
Fig. 5. (a) Schematic diagram of the chromatic optical monitoring system for surface monitoring and diagnostic of laser cleaning process, (b) chromaticity (x , y , and z ) variation as a function of the number of laser pulses, (c) spectral signature change on the DW-EP (dominant wavelength-excitation purity) circular plane, and (d) the signature of dirty, clean and damaged surfaces, (e) the signature of dirty surface, clean surface and damaged surface on X-Y plot of the DW (dominant wavelength) and EL (energy level) (f) the micrographs of clean surface and damaged surface[23]
Fig. 6. Experimental setups of (a) probe beam reflection (PBR) and (b) laser plume emission spectroscopy (PES) for laser cleaning of titanium alloy[57], (c) change in reflectivity with the number of pulses, at different laser fluences[57], (d) emission spectrum in atmosphere from Ti64 at 0.7 J·cm-2[57]; (e) schematic illustration of the experimental setup of the probe beam reflection (PBR) system with He-Ne laser for online monitoring of TiN coating removal, (f) change in reflectivity with the number of pulses per spot for different laser fluences[24]; (g) Monitoring experimental set-up of phase transformation on the surface under laser irradiation based on time-resolved reflectometry, (h) time-resolved reflection spectra in the case of Ti for several laser fluences close to 1 J·cm-2 [38]; (i) OCT tomogram recorded before and after cleaning, (j) reflection FT-IR spectra of cleaned and uncleaned surfaces, the spectrum (paint+ground) of original paint layer uncoverd given for comparison
Fig. 7. (a) Comparison of fluorescene spectra during laser cleaning of painting[19]; (b) Setup of femtosecond laser bone processing based on spectroscopy of plasma and second-harmonic signals, (c) the spectral evolution at different distances between lens and specimen[58]; (d) The schematic diagram of in-situ monitoring setup of transmission electron microscope and Raman spectrometer, (e) Raman spectra of MoS2 before and after laser ablation[20]
Fig. 8. (a) Experimental design for signal diagnostics of laser ablation with acoustic, optical and electric means, (b) first peak-to-peak amplitude of the acoustic waves and ablation rate as functions of laser fluence during KrF excimer laser ablation of Si in air, (c) electric signals detected during a 532 nm Nd:YAG laser ablation of W substrate at a laser fluence of 20.3 J·cm-2 and a probe distance of 3 mm, and substrate biases are -20, -5, 0, +5 and +20 V, (d) optical intensity versus laser fluence for SiO, SiⅠ, SiⅡ and SiⅢ spectral lines during 1 064 nm Nd:YAG laser deflash of IC packages[34]; (e) Schematic representation of the hybrid photoacoustic and optical experimental apparatus, (f) maximum amplitude of cross correlation operation calculated for the first 15 laser pulses, (g) optical images recorded for the first 15 laser pulses[60]; (h) The thermal variation during bone drilling process[58]
Fig. 9. (a) Schematic diagram of the detection of laser-induced plasma, (b) flowchart of elemental concentration measurement using operating parameter conditioned SVR and spectral signals[50]; (c) Schematic depicting the metal SLM process technology, (d) an illustration of deep belief network with stacked RBMs for five-state recognition in the SLM process, (e) five defect states of the SLM process, i. e. balling, slight balling, normal, slight overheating, and overheating[63]; (f) The schematic diagram of laser welding and monitoring system, (g) weld geometry and temperature distribution procedure using ANN according to experimental and numerical data[64]

Download Citation
Set citation alerts for the article
Please enter your email address


