• Acta Photonica Sinica
  • Vol. 51, Issue 2, 0212002 (2022)
Minge GAO1, He YUAN2、3, Min XU2、3、*, Junhua WANG3、4, and Hailong CUI5
Author Affiliations
  • 1Academy for Engineering & Technology,Fudan University,Shanghai 200433,China
  • 2School of Information science and Technology,Fudan University,Shanghai 200438,China
  • 3Shanghai Ultra-Precision Optical Manufacturing Engineering Center,Shanghai 200438,China
  • 4Institute of Optoelectronics,Fudan University,Shanghai 200438,China
  • 5Institute of Machinery Manufacturing Technology,China Academy of Engineering Physics,Mianyang,Sichuan 621000,China
  • show less
    DOI: 10.3788/gzxb20225102.0212002 Cite this Article
    Minge GAO, He YUAN, Min XU, Junhua WANG, Hailong CUI. Research on Feature Extraction of Laser Interference Fringe and Centering Measurement Technology[J]. Acta Photonica Sinica, 2022, 51(2): 0212002 Copy Citation Text show less

    Abstract

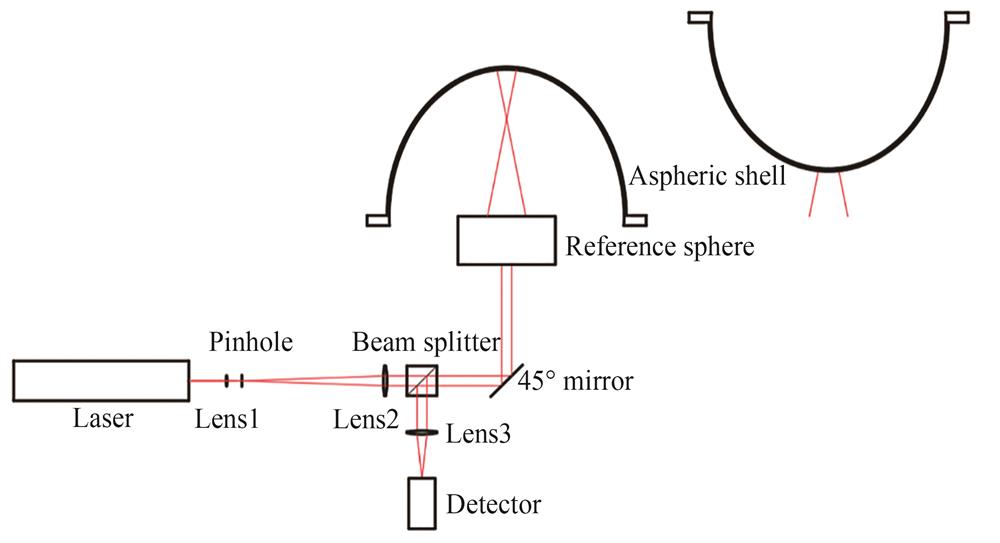
    Opaque aspherical shells are widely used in the fields of aerospace, military and communications. The thickness measurement is a key issue to ensure the manufacturing quality of such components. Since it is impossible to conduct micron-level non-destructive measurement of the thickness directly, the flipping measuring method is preferred to measure the inner and outer contours of the shell. The thickness is obtained indirectly through the inner and outer contours. In the flipping measuring method, the centering accuracy before and after the reversal should be guaranteed, which is of significance for specifying the relative positions between the double surfaces. Most of the existing centering measurement technologies are limited by accuracy or complicated structures. Focusing on these limitations, a non-contact centering measurement technology based on laser interference is proposed. The optical structure only consists of two sets of the same laser interference centering device while the measurement accuracy can reach sub-micron level. The specific implementation process is to independently design and set up a bidirectional laser interference centering device and assist the modern photoelectric detection technology and a real-time feature extraction algorithm for laser interference fringes. Finally, the high-precision centering measurement before and after the reversal is achieved. In conjunction with the high-precision hollow air bearing table and a centering and leveling device, a bidirectional laser interference centering device is designed and built to collect the interferograms of the inner and outer surface before and after the reversal. Two sets of the same laser interference centering device are performed up and down to realize the bidirectional centering measurement of the tested part, which can monitor the consistency and tilt of the tested part before and after the reversal. The laser interference centering device adopts the Kepler telescope system to realize the expansion and collimation of the laser beam. The edge stray light is filtered by the pinhole to uniform light intensity. The core of the laser interference centering device is a dedicated lens group containing a reference sphere. This lens group compensates the aberration so that the reference light and the measurement light return back along the same path. The interferograms formed by the reference light and the measurement light are recorded by the detector. Based on the modern photoelectric detection technology, a real-time feature extraction algorithm is proposed to analyze the dynamic characteristics of the interference fringes with different motion postures, which greatly improves the accuracy of dynamic recognition of laser interference fringes. Specifically, the feature extraction algorithm includes filtering, removing background noise, image binarization, image morphology operations such as erosion, closing, opening, and ossification to sharpen the interference fringes, and the centroids extraction of multiple sets of interferograms. The least squares method is used to fit centroids to obtain the least squares radius, which is considered as the radius of rotation of the interferograms. The mathematical model has been built, in which the radius of rotation of the interferogram is treated as the input and the centering deviation of the evolving axis of the opaque aspheric shell and the rotation axis of the hollow air bearing table as the output. Once the radius of rotation of the interferogram is known,the definite centering deviation of the evolving axis of the opaque aspheric shell and the rotation axis of the hollow air bearing table can be calculated through the mathematical model built. The centering accuracy of the proposed technology is derived theoretically and compared with an inductance micrometer with a certain accuracy in the experiment. The experimental results are consistent with the theoretical results, which proves that the laser interference centering device and real-time feature extraction algorithm can effectively improve the centering accuracy. The absolute centering accuracy can achieve 0.424 microns. The centering measurement is carried out during the thickness measurement of the opaque aspheric shell by the flipping measuring method. Using the laser interference centering device and feature extraction algorithm proposed in this paper, the centering deviations of the evolving axis of the opaque aspheric shell and the rotation axis of the hollow air bearing table before and after the reversal are successfully specified. The centering measurement technology meets the centering requirements and provides a positioning guarantee for the thickness measurement accuracy of the opaque aspheric shell by the flipping measuring method. As a result, the accuracy of profile and thickness measurement of the opaque aspheric shell is improved.
    Minge GAO, He YUAN, Min XU, Junhua WANG, Hailong CUI. Research on Feature Extraction of Laser Interference Fringe and Centering Measurement Technology[J]. Acta Photonica Sinica, 2022, 51(2): 0212002
    Download Citation