• Chinese Journal of Lasers
  • Vol. 45, Issue 11, 1102012 (2018)
Tao Ma1、2、*, Tingting Liu1、2、*, Wenhe Liao1、2, Liyi Jiang1、2, and Zhennan Xiao1、2
Author Affiliations
  • 1 School of Mechanical Engineering, Nanjing University of Science and Technology,Nanjing, Jiangsu 210094, China
  • 2 National Joint Engineering Laboratory for Numerical Control Forming Technology and Equipment,Nanjing, Jiangsu 210094, China
  • show less
    DOI: 10.3788/CJL201845.1102012 Cite this Article Set citation alerts
    Tao Ma, Tingting Liu, Wenhe Liao, Liyi Jiang, Zhennan Xiao. Fatigue Properties of Ti-6Al-4V Produced by Selective Laser Melting[J]. Chinese Journal of Lasers, 2018, 45(11): 1102012 Copy Citation Text show less
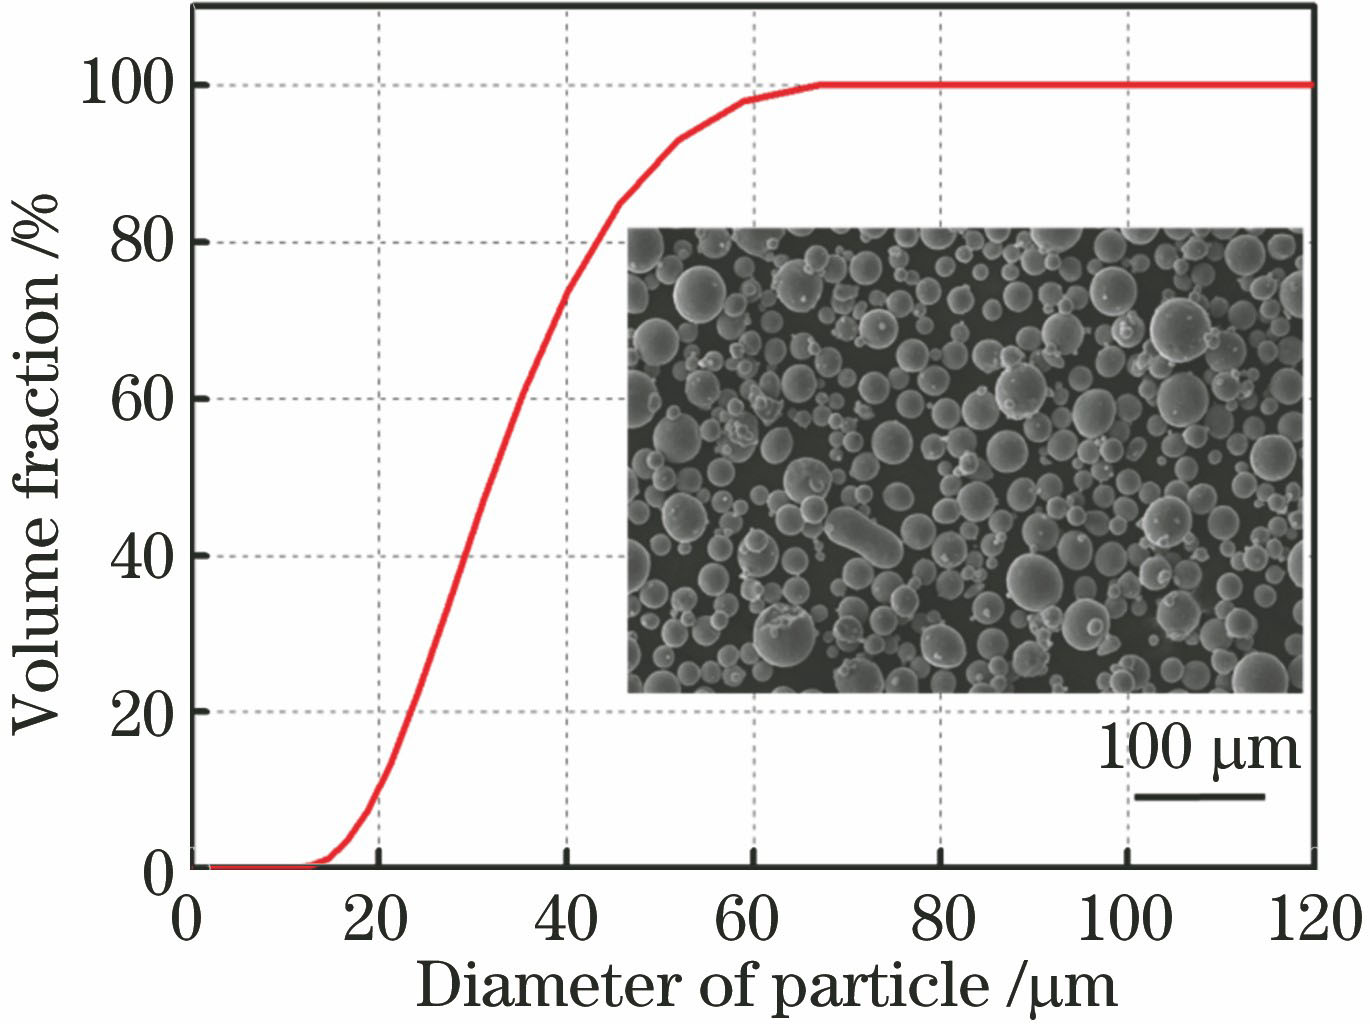
    Ti-6Al-4V powder particle size distribution
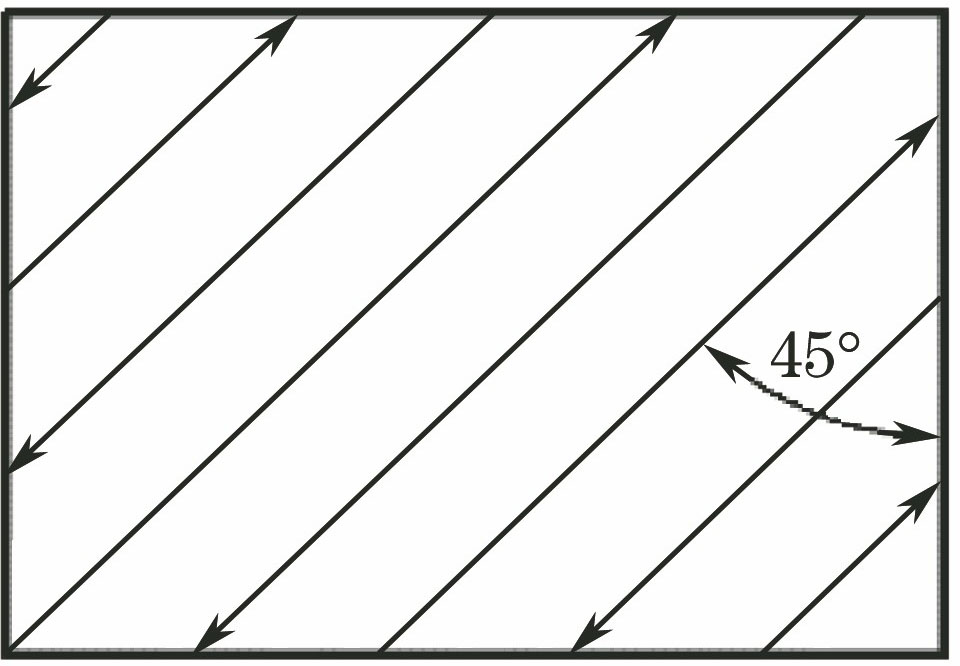
    Fig. 1. Ti-6Al-4V powder particle size distribution
    Scan strategy of Zig-Zig
    Fig. 2. Scan strategy of Zig-Zig
    Ti-6Al-4V alloy formed by SLM. (a) Fatigue specimen; (b) cylindrical drawing specimen
    Fig. 3. Ti-6Al-4V alloy formed by SLM. (a) Fatigue specimen; (b) cylindrical drawing specimen
    Stress-strain curves of static tensile specimen before and after 840 ℃/2 h/AC heat treatment
    Fig. 4. Stress-strain curves of static tensile specimen before and after 840 ℃/2 h/AC heat treatment
    Fracture surface morphologies of samples after different heat treatments. (a) Untreated; (b) 840 ℃/2 h/AC
    Fig. 5. Fracture surface morphologies of samples after different heat treatments. (a) Untreated; (b) 840 ℃/2 h/AC
    Fatigue life of Ti-6Al-4V alloy under different treatments at a constant stress of 330 MPa
    Fig. 6. Fatigue life of Ti-6Al-4V alloy under different treatments at a constant stress of 330 MPa
    Fracture surface morphologies of fatigue samples after different treatments. (a) As-built; (b) polished; (c) heated and polished
    Fig. 7. Fracture surface morphologies of fatigue samples after different treatments. (a) As-built; (b) polished; (c) heated and polished
    Microstructure. (a) OM photo and SEM photo of the untreated sample; (b) OM photo and SEM photo of Ti-6Al-4V after 840 ℃/2 h/AC annealing treatment. In (a) and (b), the α' phase is light and the β phase is dark
    Fig. 8. Microstructure. (a) OM photo and SEM photo of the untreated sample; (b) OM photo and SEM photo of Ti-6Al-4V after 840 ℃/2 h/AC annealing treatment. In (a) and (b), the α' phase is light and the β phase is dark
    XRD patterns of Ti-6Al-4V samples fabricated by SLM
    Fig. 9. XRD patterns of Ti-6Al-4V samples fabricated by SLM
    Stiffness as a function of cycle number of fatigue life for as-built sample, polished sample and polished sample after heat treatment
    Fig. 10. Stiffness as a function of cycle number of fatigue life for as-built sample, polished sample and polished sample after heat treatment
    Surface defects of SLM specimen
    Fig. 11. Surface defects of SLM specimen
    Fatigue fracture morphologies of directly formed fatigue specimens with different cycles of fatigue life. (a) Fatigue life is 23397 cycle; (b) fatigue life is 24118 cycle; (c) fatigue life is 24039 cycle; (d) fatigue life is 19934 cycle; (e) fatigue life is 26018 cycle
    Fig. 12. Fatigue fracture morphologies of directly formed fatigue specimens with different cycles of fatigue life. (a) Fatigue life is 23397 cycle; (b) fatigue life is 24118 cycle; (c) fatigue life is 24039 cycle; (d) fatigue life is 19934 cycle; (e) fatigue life is 26018 cycle
    Correspondence between initial fatigue cracking defect and fatigue life of polished sample and polished sample after heat treatment
    Fig. 13. Correspondence between initial fatigue cracking defect and fatigue life of polished sample and polished sample after heat treatment
    Three-dimensional morphologies of the scanning line at 180 W and poor overlap defects on the XOY plane. (a) Scanning line in the X direction; (b) scanning line in the Y direction; (c) poor overlap defects on the XOY plane
    Fig. 14. Three-dimensional morphologies of the scanning line at 180 W and poor overlap defects on the XOY plane. (a) Scanning line in the X direction; (b) scanning line in the Y direction; (c) poor overlap defects on the XOY plane
    CompositionAlVFeCONHMoMnCuSnYZrTi
    Massfraction /%5.5-6.753.5-4.50.140.0070.130.0070.002<0.05<0.05<0.05<0.05<0.05<0.05Bal
    Table 1. Chemical composition of Ti-6Al-4V alloy power
    Laser powerP /WVelocity v /(mm·s-1)Scan strategyHatching spacingh /μmLayer thicknessτ /μmAdditionalcontour /μm
    1801250Zig-Zig10530Inside-75
    Table 2. Forming parameters of Ti-6Al-4V alloy produced by SLM
    Heat treatmentRm /MPaRp0.2 /MPaA /%Z /%
    SLM1130.551079.4412.7322.49
    840 ℃/2 h/AC971.44948.9218.1128.14
    Reference989.8942.715.643.6
    Table 3. Mechanical properties of Ti-6Al-4V alloy produced by SLM under different heat treatments
    Tao Ma, Tingting Liu, Wenhe Liao, Liyi Jiang, Zhennan Xiao. Fatigue Properties of Ti-6Al-4V Produced by Selective Laser Melting[J]. Chinese Journal of Lasers, 2018, 45(11): 1102012
    Download Citation